Showing posts with label Marta Gruca. Show all posts
Showing posts with label Marta Gruca. Show all posts
Friday, July 7, 2017
Monday, January 9, 2017
Further research on the material
Previously, we ended up our exploration on foam. After discussion we have found that it's not suitable material to use in the pavilion - it's flammable, not recyclable etc. During free time we made further exploration on materials.
Firslty we thought about silicones. We did some experiments with different kind of them.
1) Silicone dentist paste


Firslty we thought about silicones. We did some experiments with different kind of them.
1) Silicone dentist paste

making a "paste"

stick the "paste" onto the model

take off the model
This material doesn't need any additional support. But there are several disadvantages: it can break quite easily, the final apperance is not satysfying.
2) Fluid silicone


mixing the two fluids

stick it onto the wall


take it off
This silicone worked better-because of its fluidity in the first stage, we can obtain more complicated shape. It's also more flexible and rigid, but in the makro scale it needs a support construction.
There is also one big disadvantage of using silicone in makro scale, this material is also not recyclable. So, we made another research.
We found out three materials which are working in makro scale and can create differents shapes.
Bioplastic, fungus and gelatine/agar-agar.
Insired by those we made our pavilion manifesto.
The architecture object can be alive and function like a living creature. The biological space is self-creating spatial systems. Using the bio-active materials we can create spaces. The polimeric layer is the spatial border, structural border and the same it constitute a kind of "soil". On its surface is possible to grow plant organizms.
"Nature doesn't need to use additional forces. Nature use itself."
First material is fungus. There are already several exaples of using it.

Second one is bioplastic. "A bioplastic is a type of plastic that can be made from plant starches or gelatins/agars. They are better for the environment because they are not derived from petroleum. They can also be easily made at home by combining the proper amounts of ingredients and heating them on the stove. The solution can then be removed from the heat and molded into whatever shape you would like."
Gather the necessary materials. To make this type of bioplastic, you will need cornstarch, distilled water, glycerol, white vinegar, a stove, a saucepan, a silicone spatula, and food coloring (if desired). These items should be readily available at the grocery store or online. Glycerol is also called glycerine, so try searching for that if you’re having trouble finding glycerol. The following amounts of each ingredient are needed to make the bioplastic:
- 10ml distilled water
- 0.5-1.5g glycerol
- 1.5g cornstarch
- 1ml of white vinegar
- 1-2 drops food coloring
Combine all of the ingredients and stir together. Add all of the ingredients to the saucepan and stir to combine with the spatula. Stir until you get rid of most of the lumps in the mixture. At this stage, the mixture will be a milky white color and quite watery.
Heat on medium-low. Place the saucepan on the stove and set the heat to medium-low. Stir continuously as the mixture heats. Bring it to a gentle boil. As the mixture heats, it will become more translucent and begin to thicken.[5]
- Remove the mixture from the heat when it becomes clear and thick.
- Total heating time will be around 10-15 minutes.
- Lumps may begin to form if the mixture gets overheated.
- Add one-two drops of food coloring at this stage, if you would like to color the plastic.
Pour the mixture onto foil or parchment paper. Spread the heated mixture onto a piece of foil or parchment paper to let it cool. If you would like to mold the plastic into a shape, it must be done while it is still warm. See the last method for details on molding the plastic.
- Remove any bubbles that you see by poking them with a toothpick.
Allow the plastic to dry for at least two days. It will take time for the plastic to dry and harden. As it cools, it will begin to dry out. Depending on the thickness of the plastic, it can take longer for it to dry. If you make one small thick piece it will take longer to dry than a thinner larger piece.[6]
- Leave the plastic in a cool, dry place for this process.
- Check the plastic after two days to see if it has fully hardened.
Source: here
The last one is gelatin or agar-agar. Gelatine is natural protein substance hydrolysed from the collagen in the bones and cartilage of animals. Dissolved with water it transforms into gel. Gelatine in commonly used in the food industry. Agar is also a gelatinous substance obtained from red algae. It is also commonly used as a neutral nutrient medium for the growth of bacteria in microbiological labs.
Friday, December 23, 2016
Presentation _ 23 of december 2016
This is a video of our Pecha Kucha
Here you can see all our previous process.

New way of thinking
The DFS was entirely differnt from every courses I had previously, but of course in the positive and suprising way.
At the beginning I felt quite lost. I was used to have a "program" prepared by the teacher in advance, which is saying strictly what I have to do, how much time I have for it which aim I should achieve to pass the cours etc. Secondly, I felt a bit overwhelmed by the language, cause I had the trouble (still have but smaller) in speaking in french. And the last but not least- despite I was always really admiring the connection between architecture and physics phenomenon but when it came me to experimenting I felt blocked.
After some time, I suppose, I get the course "intention". I really aprecciated the freedom of expression, the exploration without knowing where I will go. I could say, I've developed a new way of thinking - to follow the process step by step, consider every part preciesly, do experiments even if the may fail, rethink the problems and correct them, have the conclusions. I became more open-minded and changed the attitude to designing.
In the end, when I completely forgot about my old designing "habits" - having references, reforming and reusing them, our project became to me even more fascinating. Through the material exploration, fabrication I've learnd also a lot about innovation and technology.
I would like to thank to all the group and also thank you for your patience explaining purely to me some issues in english.
At the beginning I felt quite lost. I was used to have a "program" prepared by the teacher in advance, which is saying strictly what I have to do, how much time I have for it which aim I should achieve to pass the cours etc. Secondly, I felt a bit overwhelmed by the language, cause I had the trouble (still have but smaller) in speaking in french. And the last but not least- despite I was always really admiring the connection between architecture and physics phenomenon but when it came me to experimenting I felt blocked.
After some time, I suppose, I get the course "intention". I really aprecciated the freedom of expression, the exploration without knowing where I will go. I could say, I've developed a new way of thinking - to follow the process step by step, consider every part preciesly, do experiments even if the may fail, rethink the problems and correct them, have the conclusions. I became more open-minded and changed the attitude to designing.
In the end, when I completely forgot about my old designing "habits" - having references, reforming and reusing them, our project became to me even more fascinating. Through the material exploration, fabrication I've learnd also a lot about innovation and technology.
I would like to thank to all the group and also thank you for your patience explaining purely to me some issues in english.
Monday, December 19, 2016
Research on material
Now that we have tree different models, one in positif, one in negatif, and the last one just contouring the shape, we can work on another step which is to do a research on the material!
In the synopsis we made previously we describe our project as;
What about obtaining only the skin and fill it with some liquid or material which can be reversible ?
Which kind of material should be the skin like ? For realizing the touching sensation we want we did some different experiments. We filled the ballons with different infils to explore the different elasticities.

*after taking the air off the ballon the sand inside became very rigid and can take the form of another structure.
We were interested into the reversibility of sand because it would have permit to switch the structure every time we inflate it. This would have a link with the snake process because every time we make a snake grow it has a random and particular shape.
INFLATING STRCUTURE
 see more on : http://www.kokkugia.com/AADRL-BEHAVIOURAL-AFFECTS-1
We were also interesting by inflating structure because it's related to our primary chemical process. Throught inflating, we're almost recreating the reaction (starting from nothing and extending).
DEPLOYABLE STRUCTURE
see more on : https://www.seas.harvard.edu/news/2016/03/transforming-materials
or FOAM?
In the synopsis we made previously we describe our project as;
"I felt comfortable
it was made of foam !
I could shape it how I wanted, and then it get back to the initial form, it was reversible!
I could shape it how I wanted, and then it get back to the initial form, it was reversible!
My print could disapear in a second.
I could create my own intimate place,
I could personalize it,
I want to hide there forever."
What about obtaining only the skin and fill it with some liquid or material which can be reversible ?
Which kind of material should be the skin like ? For realizing the touching sensation we want we did some different experiments. We filled the ballons with different infils to explore the different elasticities.

1. air
2. sand*
3. patatoes flour
4. water
*after taking the air off the ballon the sand inside became very rigid and can take the form of another structure.
We were interested into the reversibility of sand because it would have permit to switch the structure every time we inflate it. This would have a link with the snake process because every time we make a snake grow it has a random and particular shape.
INFLATING STRCUTURE

We were also interesting by inflating structure because it's related to our primary chemical process. Throught inflating, we're almost recreating the reaction (starting from nothing and extending).
DEPLOYABLE STRUCTURE
see more on : https://www.seas.harvard.edu/news/2016/03/transforming-materials
or FOAM?
What about doing the stratification into foam ?
We read lots of topics about cutting foam and also creating foam. The foam we want is not solid so we cannot use polyurethane expansé cause it's too solid and neither the CNC (this machine cut by digging which is impossible in our project).
We found lots of explaination about cutting foam here: http://fr.24assistant.info/article/diffrents-types-de-dcoupage-industriel-techniques-foam
Making 3D model in foam is possible but it only works for small pieces.
We read lots of topics about cutting foam and also creating foam. The foam we want is not solid so we cannot use polyurethane expansé cause it's too solid and neither the CNC (this machine cut by digging which is impossible in our project).
We found lots of explaination about cutting foam here: http://fr.24assistant.info/article/diffrents-types-de-dcoupage-industriel-techniques-foam
Making 3D model in foam is possible but it only works for small pieces.
We also contact a foam agency called moussesurmesure.com
they explain us that there job was cutting sllices of big foam. They had a precision of 0.5mm and the maximum of foam memory is 10cmx160cmx200cm.
they explain us that there job was cutting sllices of big foam. They had a precision of 0.5mm and the maximum of foam memory is 10cmx160cmx200cm.
How to deal with stratification?
The solution we expose previously was too obvious and not really innovative. We found some already existing pavilions based on the similiar principle. We decided to experiment more on how we could stratifie our project. On the last post you can see that we deal with the negatif of our snake and a vertical stratification.
We use the laser cut to realize the models.


We decided to change different parameters :
- we made a biggger model (around 20x20cm)
- we select a different piece of the 3D model. This new piece was more interesting because it had some architectural property such as holes in the upper structure to catch the sun
- we experiment it on others way of stratification. The fisrt model was the positive of the snake and the second was just the contouring of the shape.


FIrstly we were satisfied of our render, the new scale was very interested and the piece we choose had lot of qualities.
Also by making our cut into cardbord we realise that it was interesting to have this kind of transparency.
As you can see on the picture the waves of the cartoon are oriented, this structure permits to see all threw our pavillon from two points of view, whereas on the others part you cannot see anything.


We found also interesting the positive structure, we asked ourself if it wasn't more interesting to see the structure from outside, in a positive way. When the structure is surrounding you you can feel another space.


So, basically here we could finished our process: dealing with wooden panels and merging them together, however we wanted to go further.
We use the laser cut to realize the models.


We decided to change different parameters :
- we made a biggger model (around 20x20cm)
- we select a different piece of the 3D model. This new piece was more interesting because it had some architectural property such as holes in the upper structure to catch the sun
- we experiment it on others way of stratification. The fisrt model was the positive of the snake and the second was just the contouring of the shape.


FIrstly we were satisfied of our render, the new scale was very interested and the piece we choose had lot of qualities.
Also by making our cut into cardbord we realise that it was interesting to have this kind of transparency.
As you can see on the picture the waves of the cartoon are oriented, this structure permits to see all threw our pavillon from two points of view, whereas on the others part you cannot see anything.


We found also interesting the positive structure, we asked ourself if it wasn't more interesting to see the structure from outside, in a positive way. When the structure is surrounding you you can feel another space.


So, basically here we could finished our process: dealing with wooden panels and merging them together, however we wanted to go further.
Monday, December 5, 2016
Realistic structural hypothesis
This means that we have to deal with structural problem.
In this hypothesis we're going to expose a possibility of realising the pavillon in wooden stratification. We got largely influence by the termite pavillon by Kraen Cliento.

Here are some different thematics:
- Material
firstly we have to deal with wether we do an horizontal or a
vertical stratification.
Horizontal woud be easier for the structure of the pavillon.

The dimension of the pavillon will be about 5m x 8m x 3,5m.
To realise this structure we need some panels of wood whiwh
size is 1,4m x 1,7m x 0,1m.
The pieces of wood are link one to each other in two
different ways.
Horizontaly the wood is link like this with a male and female structure.

Verticaly we need to add an iron structure with sticks. We
have to reflect and drive holes in the different layers.
- Extern structure
We will probably need to put the pavillon on a socle so that
the water doesn’t came by capilarity in our pavillon.
other problem of water proofing is the one from the roof. We
need to think about a waterproofing layer.

Friday, December 2, 2016
Snake process continuation - photogrammertie, 3D model
Next step in our process, was 3D scan of our shape because we couldn't manage to create big "snake" reaction. Thanks to the ALICE lab we use the photogrammertie to create the virtual model.
"Photogrammetry is the science of making measurements from photographs, especially for recovering the exact positions of surface points. It may also be used to recover the motion pathways of designated reference points on any moving object, on its components, and in the immediately adjacent environment. Photogrammetric analysis may be applied to one photograph, or may use high-speed photography and remote sensing to detect, measure and record complex 2-D and 3-D motion fields (see also sonar, radar, lidar, etc.). Photogrammetry feeds measurements from remote sensing and the results of imagery analysis into computational models in an attempt to successively estimate, with increasing accuracy, the actual, 3-D relative motions within the researched field"

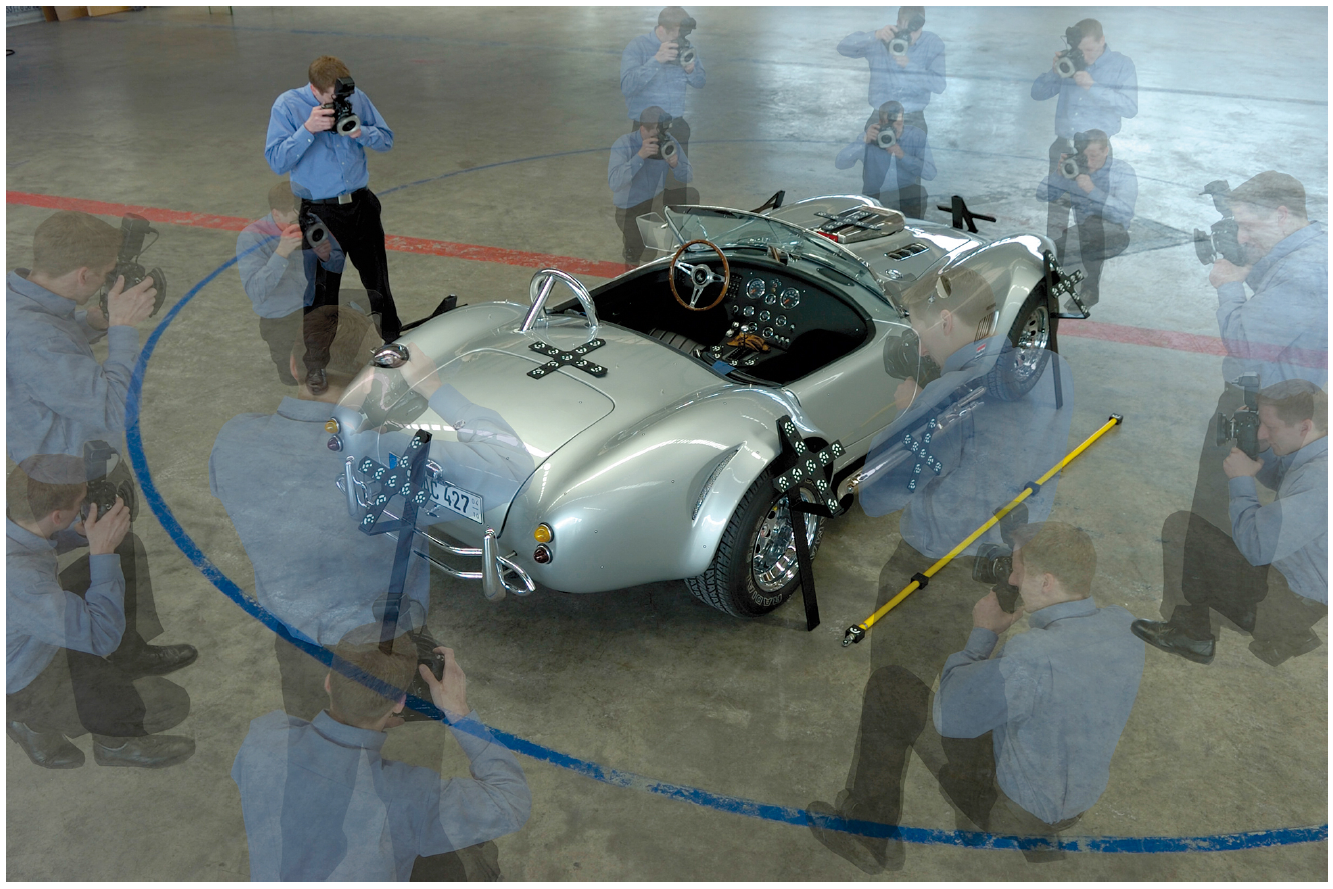
After doing the photographs the software calculated the points and created a mesh. Firsly we used MeshLab software but after we converted it and open with Rhino (pic.1,2)

(pic.1)

(pic.2)
We closed the form into a box and created the "inner" path (pic.3) Next step was to make a stratification and vertical sections (pic. 4)

(pic.3)

(pic.4)
The maquette has been almost done, We used the laser cut machine to cut the parts preciesly and after that we merged them (pic. 5,6,7)


(pic. 5,6,7)
How we will continue our process?
- we'll make the horizontal stratification and sections to see if it will work better
- try shape the tunnel in different ways
- another way to create our future pavilion will be find the way to create only the "skin" of the shape (without the box), thus, we will find references if it's possible to fabricate it, and how?
Thursday, November 24, 2016
The light at the end of the tunnel
Firstly i was scared,
i saw something weird,
like a big pillow with a tunnel inside of it,
i didn’t whether i would enter it or not,
but i was too curious, i entered in this grote.
i couldn't understand where i was,
it was nothing like i knew,
nothing was regular - a contrast to rigid and orthogonal architecture i was used to.
It has a link with physicial natural shape
the space looks like a foetus,
It has a link with physicial natural shape
the space looks like a foetus,
the walls were twisted.
I felt comfortable
it was made of foam !
I could shape it how I wanted, and then it get back to the initial form, it was reversible!
I could shape it how I wanted, and then it get back to the initial form, it was reversible!
My print could disapear in a second.
I could create my own intimate place,
I could personalize it,
I want to hide there forever.

Sunday, November 20, 2016
Workshop Jour 6
Le dernier jour nous sommes arrivées au alentours de 10h sur
les lieux. Nous avons premièrement entrepris de disposer le serpent sur notre
socle en bois. Nous avons ensuite pulvérisé notre mousse ; celle ci à la
propriété de prendre deux fois sa taille.
Nous avons patienté le durcissement de la mousse et en
attendant nous avons mis en place l’exposition. Nous avons présentées nos
recherches sur une table en bois (recherches sur les graines de lentilles,
recherche sur la densité de la structure, recherche sur l’incidence de la
forme, les propriétés isolantes…)


Tout ce processus était plutôt clair dans notre tête et nous
avons voulu le mettre en évidence à l’aide d’un large tableau.
La nuit commençait à tomber, nous sentions l’heure de la
remise approchée. Nous avons remis notre power point. J’ai aussi convié des
amis curieux de découvrir nos travaux. La présentation sous forme de pecha
kucha fût comique et chaleureuse. A la fin de nos présentations nous nous
sommes rapidement séparés. Chacun a récupéré ses affaires et notre chouette
semaine de workshop se termina.
Workshop Jour 5
Le matin nous avons donc démoulé la cire. Le moulage en cire
présentait les mêmes symptômes que celui en résine ; l’extraction de notre
structure « serpent » était impossible.


Désemparées nous sommes sorties dehors s’aérer l’esprit. Un
des physiciens qui avait suivit notre expérience nous montra la présence de
mousse sur un des rochers de l’atelier ; des microorganismes avait grandit
libérant même une plante verte. Intriguées nous avons fait le lien avec notre
structure. Serait-il possible de faire poussé des graines dedans ? En plus,
la présence de sucre pourrait fournir des nutriments à la plante.
Nous sommes de ce pas allé chercher des lentilles et avons
patienté.


D’un autre côté le moulage de notre serpent apparaissait
infaisable. Mais avec cette réflexion sur la structure même de notre mousse
nous avons pensé réaliser la composition du moulage avec les mêmes propriétés
physiques que notre « serpent » ; c’est à dire pourquoi pas
mouler notre structure dans de la mousse ???
Nous avons donc fait le tour des locaux à la recherche de
mousse. Nous avons était aiguillé, il existait effectivement une bombonne de
mousse polyuréthane. Intriguées par cet isolant nous avons décidé de l’utiliser
afin de réaliser le moulage. Après une heure celui-ci était sec. Nous avons
donc sorti ce bloc de la fameuse boite en bois.

Nous avons réalisé une autopsie de notre structure. Nous
étions vraiment contente du résultat ! Le serpent n’avait pas été
compressé par la mousse polyuréthane.
Nous avons donc décidé de refaire cette expérience à plus
grande échelle le lendemain.

Nous sommes passé chez Brico acheter de la mousse polyuréthane
expansée. Nous nécessitions un moule afin de placer notre serpent et
« couler » notre mousse. Nous nous sommes attelées la journée durant
à la combustion de sucre et de bicarbonate ainsi qu’à la réalisation d’un grand
cadre en bois de 1m*1m*10cm. Sa découpe a été difficile et nous avons attendu
le lendemain afin de réaliser notre œuvre d’art.
Workshop Jour 4
Heureuses et impatientes de découvrir notre fameuse résine
solidifiée nous sommes arrivée de bonne heure à l’atelier. La résine avait bien
pris, les proportions étaient respectées. Fière de notre travail nous avons décidé
de couper le moulage du serpent en tranches afin d’observer notre structure à
l’intérieur du plastique. Notre but premier était de retirer le serpent afin de
libérer une sorte de tunnel vide. Quelle déception ! La résine s’était insérée
dans les bulles d’air intérieur de notre serpent, rendant la manipulation pour
l’extraire impossible.


Workshop Jour 3
Ce matin là nous sommes allées à Schleiper chercher notre
fameux bi-composant ainsi que du sucre et du bicarbonate en grande quantité.
Lorsque nous sommes retourné à l’atelier nous avons
entrepris de continuer à créer nos serpents. Le moulage dans la résine de notre
serpent nécessitait un cadre. Nous avons donc pris du bois et constituer une
« jolie » boîte en bois. Cela paraît relativement simple, et pourtant
cela implique l’utilisation d’une scie et d’une visseuse. Ce fut, je
l ‘avoue, la première fois que j’utilisais ces outils.

Nous avons ensuite recouvert la nouvelle boite de plastique
afin que la résine n’accroche pas sur les rebords. Finalement nous avons coulé
la résine. Sa solidification dure 6h, nous avons donc fait reposé la résine
toute la nuit.
Workshop Jour 2
The second day we purchased the necessary ingredients for making the chemiacal reaction. We started to produce small samples of our foam material.


Next step: indentifing the physics properties.

Firstly we made the tempature measures, We compared our foam with wool insulation, sand and water. We heated them to see the increase and then the decrease of their temparature. Our conclusion was really suprising. The baking soda+sugar material has similar properties as wool insulation. It becomed warm and then cold as fast as wool insulation.

Next step was to examine the capilarity/density of our material. The conclusion: it is not sinking.

The last examination -pressing measures. Unfortunately our material is not resistant for pressing.
Et the end of the day we was thinking about dealing with the structure and obtaining the negatif. Which is the best way to receive it? "Put into resine" was our answer and the same our next step.
Workshop Jour 1
This day began with a good clean-up of the main rooms of the building. After the lunch we started discover the building, find some inspirational space for our future installation. Sometimes we were also a little bit scared while entering to a dark spaces.


Our tiny excursion gave us some ideas, so next step was brainstorming. We began to talk about our last experiences we made during the cours. These were based mainly on chemical phenomena-creating some random structure from reactions. We assembled them all together and made comparison between them.


Our tiny excursion gave us some ideas, so next step was brainstorming. We began to talk about our last experiences we made during the cours. These were based mainly on chemical phenomena-creating some random structure from reactions. We assembled them all together and made comparison between them.

We decided to work and make research on baking soda+sugar material. The conclusion of our first day brainstrom was to create a pavilion which is not entirely determined by us. We wanted to use the produced shape and take a negatif of it.
After discussion we all went to the skatepark to exercise some sport. At the end of the day everyone was so exhausted, thus, after the meal everyone went sleep.
Subscribe to:
Posts (Atom)